Hardware Description Languages
The two most common Hardware Description Languages are Verilog and VHDL.
As explained in Turning code into gates, a synthesis tool is used for converting
the human readable HDL into a netlist representation. The synthesis tool used in the Fomu
toolchain is called yosys. Once we have the netlist representation, a tool called
nextpnr performs an operation called place and route (PnR), which makes it something
that will actually run on the FPGA. This is all done for you using the Makefiles in the
subdirectories of any of the following examples: verilog,
vhdl, mixed-hdl, or migen.
Note
nextpnr is timing-driven. This means that a design will be generated with a given
clock domain guaranteed to perform fast enough, but sometimes it won’t optimise further.
When the make command runs nextpnr-ice40 you will see something similar to the
following:
Info: Max frequency for clock 'clk': 73.26 MHz (PASS at 12.00 MHz)
This output example shows that we could run clk at up to 73.26
MHz and it would still be stable (even though we only requested 12.00
MHz). Note that there is some variation between designs depending on
how the placer and router decided to lay things out, so your exact
frequency numbers might be different from the ones shown in the code
blocks of this documentation.
Important
As explained in About Fomu, Fomu implements its USB in a softcore, and the bitstream that runs on the FPGA must provide the ability to communicate over USB. That is a tradeoff for achieving such a tiny board size, which unfortunately makes it not straightforward to use non-trivial HDL designs. This is because I/O is very limited, hence, it is challenging to actually see whether the designs are behaving as expected. Ideally, a USB-to-UART core would be provided for users to instantiate in their HDL designs. Should you be interested in helping achieve it, let us know! Meanwhile, Migen and LiteX examples provide a working SoC that allows interacting through USB using a Wishbone Bus.

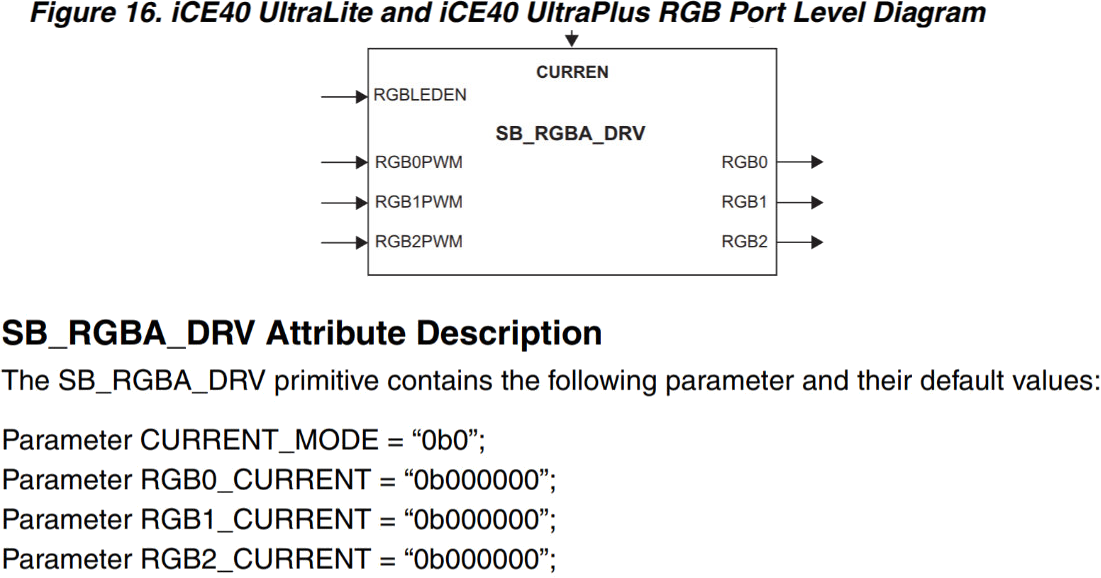
iCE40 UltraLite and iCE40 UltraPlus RGB Port Level Diagram.
Regardless of the HDL language or higher abstraction programming language used for
describing the design, all the examples in this workshop do use the hard RGB block
for driving the LED on the board. It is defined as a Verilog module or VHDL component
named SB_RGBA_DRV.
As shown in the block diagram from the datasheet, the RGB driver has five inputs
(CURREN, RGBLEDEN, RGB0PWM, RGB1PWM, and RGB2PWM),
and three outputs (RGB0, RGB1, and RGB2). It also has four parameters:
CURRENT_MODE, RGB0_CURRENT, RGB1_CURRENT, and RGB2_CURRENT. As a result,
it allows driving the LEDs safely, by specifying the current limit for each of them.
More information on this driver can be found in the ICE40 LED Driver Usage Guide.
Attention
Even though it is possible to drive the RGB outputs directly (i.e. without instantiating
SB_RGBA_DRV), it is strongly discouraged, as it might damage the LEDs.
